The how and why of creating Broken Roads’ visual target

From the outset, we always wanted Broken Roads to have the feel of a “playable artwork”, and have actively worked towards the goal of maintaining a painterly style throughout. The image above was created by our Art Director and Lead Concept Artist Kerstin Evans to define the visual target for Broken Roads. Kerstin explains the how and why of making this image in the blog below.
As Art Director, it’s my job to define the visual style of the game, and also guide the rest of the team towards that goal. In order to do this, I needed to create a visual target: a piece of concept art that shows what the finished product is meant to look like. The responsibility of creating a visual target image does not fall entirely on the concept artist’s shoulders. The concept artist must consult with each department to understand the existing challenges that the whole team must overcome to achieve the visual target. This consultation process is essential to discovering what is and what is not possible when factoring in restrictions of budget, time, and team skill. Thus, the visual target image is not only an artistic measuring stick, but also something that can realistically be aimed at for production of the entire game.

In the beginning, we just had the portrait of my character Ally to guide the team. It could only get us so far. The team managed to make lots of props, characters and VFX that closely resembled what we wanted for the game’s art style. Once the team had done all we could do, the next step was the visual target.
My goal in creating the visual target was to show the style of the game, but also of the mood and liveliness of the world as well. Our levels are quite large, so I needed to choose my location wisely. In true Aussie fashion, I picked the beer garden scene.

So, how does this image get created? Ryan Gee, our VFX artist sent me renders of a few of our favourite characters, posed in action. Then, I cropped our level design image for this scene down to the ratio I needed. This ratio is reflective of our in-game zoom level. When viewed at 100% pixels, the image is closest to our in-game zoom level. Fitting the image to the screen shows you what our minimum zoom would be. This helped me determine how much detail could actually be seen in-game, and stopped me from putting too much detail in.
Once I had my characters and my base crop of the level, it was up to me to paint, paint, paint! I want to reiterate that the purpose of this image is to be a practical visual guide, not to be a perfect illustration. I painted in the sun lighting for the overall scene, touched up characters (internal line-work and render style) and added some VFX suggestions such as glow from the campfire.

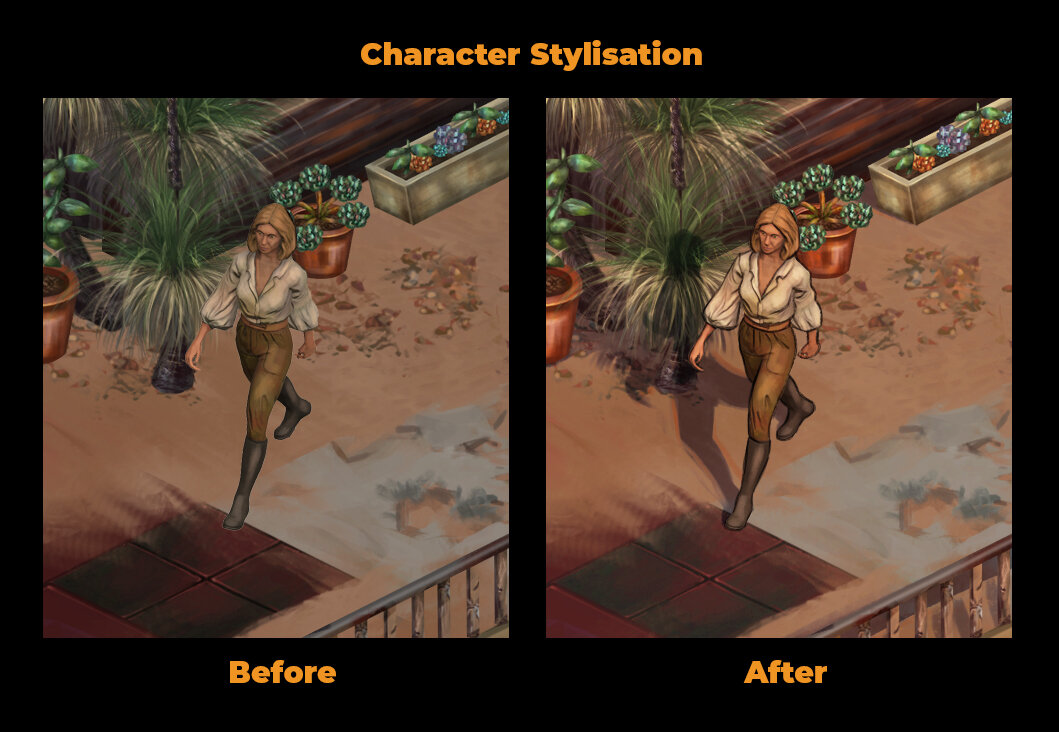
To achieve a more organic look, I place “decals” over the hard edges and the monotonous repeated patterns of the tiled ground. These decals vary from simple chunks of brush strokes to unique, detailed, organically painted areas of ground (e.g. tuft of grass, cracks in concrete or a group of pebbles). Sometimes I take parts of the ground tiles and piece them together to make something entirely new. Much of this work happened in a separate file from this concept art. You can see the before and after below from another section of the level. Note that this section does not have any lighting painted into it, except for some occlusion to define the form of the ground. The placement of the props also move slightly to best fit the ground layer.

Once these decals are placed, I then do a last check for any areas that could use some more stylisation. At this stage, it’s all hand painted work. My edits range from simple decal-like brush strokes to more detailed work on the ground tiles themselves, making the world look more worn down and post-apocalyptic.

Sounds simple, right? This is all thanks to our skilled artists and tech team. Before I even started on the visual target concept art, our team went through months of trial and error to see if we could hope to emulate the target style in the first place. The paint over went so smoothly because I had a fantastic base to work with and our team had defined how much further we should aim to take the style.
The great news is that we are very, very close to reaching our visual target in game. Reaching our visual target is not something that should be rushed. Art takes take time and requires evaluation at each milestone. I’m so proud that our team has reached this milestone, and that we are at a point where we could create this visual target image to help us reach the finish line.
